Configuring your devices
Since BrewPi 0.2, the hardware setup is dynamic and flexible: you can install and uninstall hardware from the web interface. This is all done from the Device Configuration tab in the web interface. From the device manager you can assign hardware (temp sensors, SSRs, etc.) to functions.
The current implementation of the device manager is a bit complicated and basic, but we are working on a more user friendly interface. I hope that this document will help you set it up.
Your devices just after programming
If you have just uploaded a HEX file to your Arduino and the EEPROM was reset, it will depend on your shield version which devices are already installed.
RevC shields
For RevC shields no devices are installed by default.
RevA shields
For RevA shields your devices are set up just like they were in version 0.1 for backwards compatibility. A heater, cooler and door switch are already installed. Also, 2 temperature sensors are installed as ‘First device on bus’. You will notice that the 2 temperature sensors are also listed under Detected devices, based on their address.
If you would like to switch from ‘First device on bus’ to address based assignment, remove the 2 installed temperature sensors by setting their function to None and clicking apply. After that you can install the detected sensors based on their address. A RevA shield has two OneWire ports. You can connect multiple sensors to both if you use address based sensors.
Receiving the device list
Click Refresh device list to receive an updated list of installed and detected devices from the Arduino. To be able to receive the device list, the BrewPi script has to be running.
Installed Devices
All devices that are assigned to a function are found under Installed devices.
Detected Devices
- The detected devices list shows all devices that are automatically discovered by BrewPi, these include:
- All OneWire devices (temperature sensors and DS2413 OneWire switches)
- All pins for which there is a terminal on your shield
Device properties
Each device has the following properties:
| Device setting/property | What it does |
|---|---|
| Device slot | A device is installed into a device slot. This is a unique number used to identify the device.
When configuring your devices, make sure there are no 2 devices with the same slot.
|
| Assigned to (chamber) | Each device is assigned to a Chamber. Currently there is only Chamber 1, but we are preparing
for future multi-chamber support. Select Chamber 1 for all your devices.
|
| Assigned to (beer) | In each chamber, each device is either a Chamber device or assigned to a beer. Currently all
support devices are chamber devices, except for the beer temperature sensor which should be
assigned to Beer 1
|
| Function | This is the most important setting for your device. Here you can set what the device should do.
The function list is automatically limited to functions that fit with the hardware type.
Currently supported functions:
* Chamber temp: the sensor in the fridge (chamber device).
* Beer temp: the sensor in your beer (beer device).
* Room temp: measures any temperature you want, but is not used in the algorithm, just for
logging. (chamber device)
* Chamber cooler: The output that controls your fridge compressor (chamber device)
* Chamber heater: The output that controls your heater (chamber device)
* Chamber light: This output is activated when the door is opened (see chamber door) and
can also be used as heater by enabling light as heater in advanced settings
* Chamber door: an input that detects when the fridge door is opened.
|
| Device type | Not user configurable, set automatically based on assigned function.
|
| Hardware type | Not user configurable, set automatically. (Temp Sensor, Digital pin or OneWire actuator)
|
| Device type | Not user configurable, set automatically based on assigned function.
|
| Pin type | Here you can set whether the output/input should be inverted. Because the shields have a
transistor that inverts the signal behind each output with a terminal, you should set this to
inverted. For devices you add yourself, without a transistor, do not invert the signal.
For the door switch, it depends on the type of switch you have.
|
| Arduino Pin | The pin the device is configured for. You can only set this yourself when defining a new device.
The OneWire pins are hardcoded, you can not add your own OneWire pins. Just connect your sensors
sensors to an existing OneWire pin and refresh the device list to detect it.
|
Installing new devices and assigning them to a function
You can install a device by changing the properties to a correct configuration and hitting Apply. If the values are accepted by the Arduino, your device will show up under Installed Devices after refreshing the list.
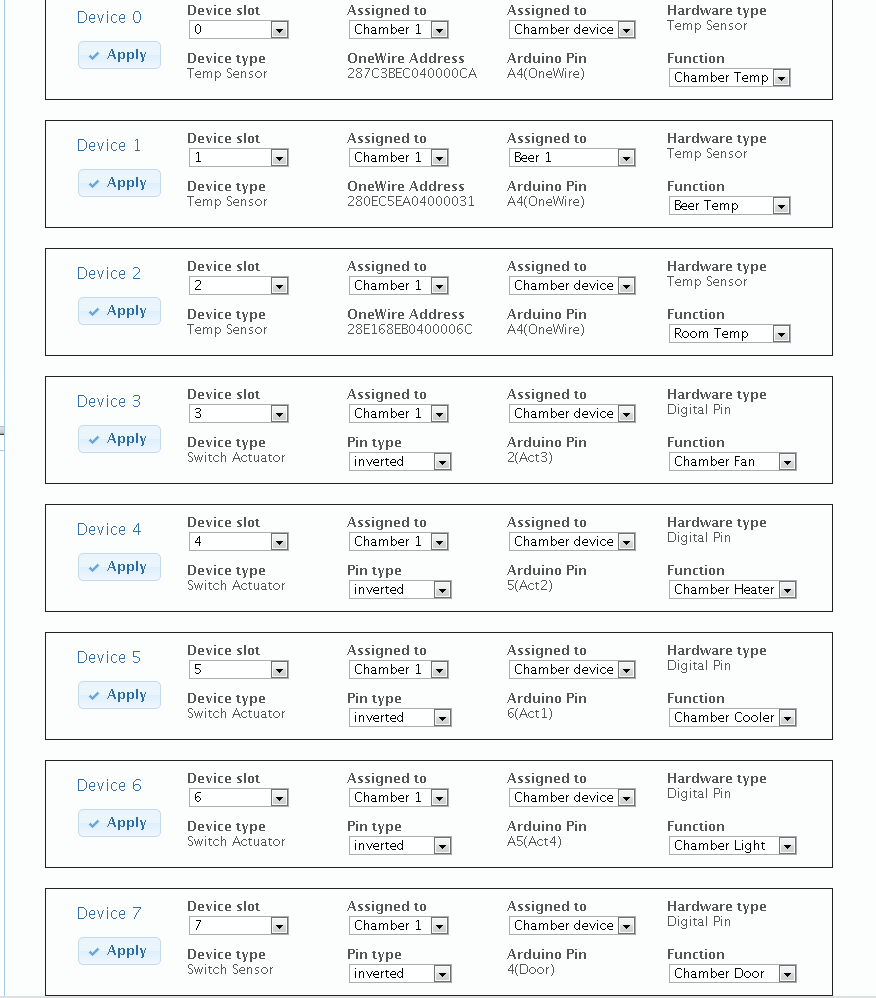
Please refer to the screenshot below for a reference configuration with all devices installed currently supported by BrewPi. Just leave out any devices you don’t have.
Uninstalling a device
To uninstall a device, just set it’s function to None, hit Apply and refresh your device list.
Done!
That was the last step of ‘Getting started with Brewpi’! Enjoy using your BrewPi and don’t forget to come and have a chat in the BrewPi IRC channel!